
How to configure OPAL for multi-user use
Background information
Starting with OPAL 2.0, all patient data is stored as a tree of files (some hidden) under one directory. In Opal Explorer, selecting View..Options... displays the Options dialog box. The first tab ("Opal Data Folder") contains the "Data Folder" setting. For a standalone PC running Opal, this would typically point to a local data folder "C:\Opal2Data".
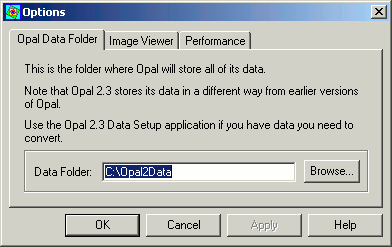
To access data on a network, you can use UNC path, such as "\\myserver\opal2data", but you may find performance better if you map the remote directory as a drive (e.g. O:) and specify that drive in the Data Folder setting (e.g. "O:\").
Configuring a server
No special software is required on the server, but you will need some suitable Opal data.
If you install Opal on the server, then part of the installation process will allow the creation of a template data set. By default this is created under C:\Opal2Data, but you can specify the location. The Opal 2.3 Data Setup program will not overwrite an existing directory.
Alternatively, you can simply copy an Opal data tree from a standalone PC running Opal 2.x to the desired location on the server. Make sure you include all hidden files.
If you have two or more standalone PCs running Opal and want to combine the datasets into one on a shared server, then I would suggest the following steps:
- Copy the Opal data tree from one standalone PC to the desired location on the server (e.g. from C:\Opal2Data on the standalone PC to D:\Shared\Opal2Data on the server).
- Rename folders directly under the server's Opal data folder to avoid clashes when the second PCs data is copied (e.g. "Main" -> "Main1" and "Reference" -> "Reference1").
- Copy the subtrees of the Opal data folder on the second standalone PC into the Opal data folder on the server.
- Optionally, rename the folders directly under the server's Opal data folder to help indicate where they came from (e.g. "Main" -> "Main2" and "Reference" -> "Reference2").
- Repeat steps 3 and 4 for any additional standalone Opal PCs.
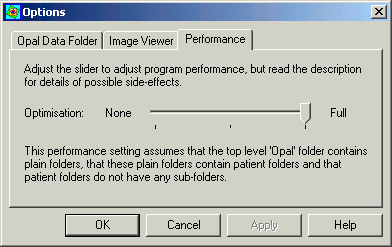
Do not create an extra level of folders below the server's Opal data folder to organise data from different sources. Restructuring the data in that sort of way prevents the use of optimisations when accessing data over the network. See the Performance tab of the Options dialog box...
Configuring a client
If a PC already has Opal installed on it, you essentially just set the Opal Data Folder to point to the data on the server. As mentioned in the "Background information" section above, it may improve performance to map the shared network folder to a drive first.
If a PC does not have Opal installed on it, then you will probably need to install it. Some sites may attempt to provide access to shared application programs over the network, but Opal works better with certain registry settings that may require a local installation. Part of the installation process invokes the Opal 2.3 Data Setup program. I would suggest that you proceed with the data setup, selecting the checkbox marked "Create default folders and files only". Once installation is complete, run Opal Explorer and change the Opal Data Folder to point to the data on the server.
Installing Opal 2.3 creates some keys in the registry that allow individual user accounts to have different Opal settings. This is useful in that it allows different users to work with different datasets, but it may require more configuration.